定義済みのSMAを呼び出しGMMAを作る
ver1.8.4.0よりカスタムインジケーター作成とストレタジーテスターは個人利用データ使用時のみ可能になりました。 FXCM配信データを使っている場合はご利用いただけません。
概要
addItemIndicatorメソッドを使えば定義済みのアイテムインジケーターを呼び出すことが可能です。 定義済みのSMAを呼び出してGMMAの作成方法について説明します。
他の人が作成したインジケーターを追加することも可能ですが、作成者により悪意を持ったコードが埋め込まれている可能性があります。信頼できるコードのみを使用するようご注意ください。
GMMAの説明はアイネット証券様のサイト等を参照してください。 アイネット証券:GMMA(複合型移動平均線)
addItemIndicator の使用例
このサンプルを実行する前に、tutor.SMAを登録してください 参照:単純移動平均を作る
tutor.SMAのコード
export default (): ItemIndicator<
    {
        period: number
        lineColor: string
        lineWidth: number
        lineDash: number[]
        targetOhlc: 'opens' | 'highs' | 'lows' | 'closes'
    }, {
        smaBuffer: IndicatorBuffer
    }

> => {
    return {
        type: 'i',
        name: "tutor.SMA",
        onInit() {
            const { period, targetOhlc, ...smaParams } = this.params
            const smaBuffer = this.smaBuffer = this.addLineBuffer(smaParams)
            this.shortName = 'SMA'
            this.onChartChange = ({ index, ...rest }) => {
                const targetBuffer = rest[targetOhlc]
                if (!targetBuffer) {
                    throw new Error(`${targetOhlc}にはopens,highs,lows,closesを指定してください`)
                }
                targetBuffer.sma(smaBuffer, period, index)
            }
            this.getDisplayData = (index) => {
                return {
                    sma: smaBuffer.get(index)
                }
            }
        },
        params: {
            period: 25,
            lineColor: 'red',
            lineWidth: 2,
            lineDash: [3, 3],
            targetOhlc: 'closes'
        }
    }
}
addItemIndicatorの例として、SMAを2つ追加します。
export default (): ItemIndicator => {
    return {
        type: "i",
        name: "tutor.addItemIndicatorSample",
        onInit() {
            const sma1 = this.addItemIndicator('tutor.SMA', { //1
                period: 25
            });
            const smaBuffer1 = sma1.smaBuffer //2
            const sma2 = this.addItemIndicator('tutor.SMA', { //3
                period: 50,
                lineColor: 'cyan',
                lineDash: [],
                lineWidth: 3
            })
            const smaBuffer2 = sma2.smaBuffer
            // this.onChartChange=()=>{} //4
            this.getDisplayData = (index) => { //5
                return {
                    sma1: smaBuffer1.get(index),
                    sma2: smaBuffer2.get(index)
                }
            }
        }
    }
}
| 1 | 定義済みのtutor.SMAを呼び出しています。 |
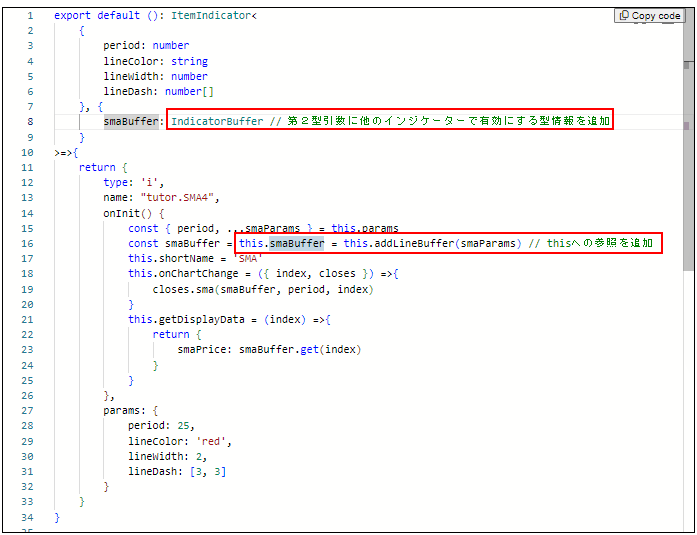
| 2 | addItemIndicatorで呼び出したの型情報にemaBufferが含まれています。 SMAを定義した時を定義した時に、ItemIndicator型の第2引数にsmaBufferを登録し、thisへの参照を追加した為です。  | 3 | 上記とは別に、tutor.SMAを呼び出しています。 呼び出すインジケーターにパラメーターを渡す場合は、addItemIndicatorの第2引数にオブジェクトを渡します。 |
| 4 | addItemIndicator関数で定義済みのインジケーターを使用するだけの場合、onChartChangeイベントのオーバーライドは不要です。 |
| 5 | addItemIndicator関数で定義済みのインジケーターを呼び出した場合、getDisplayDataは引き継がれません。必要な場合は明示的に実装する必要があります。 |
GMMA
このサンプルを実行する前に、tutor.SMAを登録してください 参照:単純移動平均を作る
tutor.SMAのコード
export default (): ItemIndicator<
    {
        period: number
        lineColor: string
        lineWidth: number
        lineDash: number[]
        targetOhlc: 'opens' | 'highs' | 'lows' | 'closes'
    }, {
        smaBuffer: IndicatorBuffer
    }

> => {
    return {
        type: 'i',
        name: "tutor.SMA",
        onInit() {
            const { period, targetOhlc, ...smaParams } = this.params
            const smaBuffer = this.smaBuffer = this.addLineBuffer(smaParams)
            this.shortName = 'SMA'
            this.onChartChange = ({ index, ...rest }) => {
                const targetBuffer = rest[targetOhlc]
                if (!targetBuffer) {
                    throw new Error(`${targetOhlc}にはopens,highs,lows,closesを指定してください`)
                }
                targetBuffer.sma(smaBuffer, period, index)
            }
            this.getDisplayData = (index) => {
                return {
                    sma: smaBuffer.get(index)
                }
            }
        },
        params: {
            period: 25,
            lineColor: 'red',
            lineWidth: 2,
            lineDash: [3, 3],
            targetOhlc: 'closes'
        }
    }
}
実装例は下記です。
export default (): ItemIndicator<{
    shortPeriods: number[]
    longPeriods: number[]
    shortColor: string
    longColor: string
}, {
    shortSmaBuffers: IndicatorBuffer[];
    longSmaBuffers: IndicatorBuffer[];
}> => {
    return {
        type: "i",
        name: "tutor.GMMA",
        onInit() {
            this.shortName = "GMMA";
            const params = this.params;
            const _this = this;
            const shortSmas = params.shortPeriods.map(period => {
                return _this.addItemIndicator("tutor.SMA", {
                    period: period,
                    lineColor: params.shortColor,
                    lineDash: [],
                    lineWidth: 1,
                });
            });
            const longSmas = params.longPeriods.map(period => {
                return _this.addItemIndicator("tutor.SMA", {
                    period: period,
                    lineColor: params.longColor,
                    lineDash: [],
                    lineWidth: 1,
                });
            });
            this.shortSmaBuffers = shortSmas.map((x) => x.smaBuffer);
            this.longSmaBuffers = longSmas.map((x) => x.smaBuffer);
            this.getDisplayData = (index) => {
                return [...shortSmas, ...longSmas].reduce(
                    (acc, sma) => {
                        acc[sma.params.period] = Object.values(
                            sma.getDisplayData(index),
                        )[0];
                        return acc;
                    },
                    {} as Record<string, any>,
                );
            };
        },
        params: {
            shortPeriods: [3, 5, 8, 10, 12, 15],
            longPeriods: [30, 35, 40, 45, 50, 60],
            shortColor: "cyan",
            longColor: "pink",
        }
    }
}
補足
addItemIndicatorはネストすることが可能です。 例えば、上記のaddItemIndicatorを使用したGMMAを、別のインジケーターからaddItemIndicatorを使って呼び出すことが可能です。